Difference between revisions of "Workflow Online Calculation"
| Line 4: | Line 4: | ||
<p>Matgen also provide module to run and analyze Density Functional Theory (DFT) calculations. It relies on Tianhe-2 computing cluster to run simulation jobs, so users need to [[:login]] with their starlight account, [[:associate system account]] and make sure they have bought computing resources on Tianhe-2c WORK cluster before running DFT calculations through Matgen. Currently, Matgen only support DFT calculations which run with Vienna Ab initio Simulation Package (VASP), so to use this module, users must have valid VASP license.</p> | <p>Matgen also provide module to run and analyze Density Functional Theory (DFT) calculations. It relies on Tianhe-2 computing cluster to run simulation jobs, so users need to [[:login]] with their starlight account, [[:associate system account]] and make sure they have bought computing resources on Tianhe-2c WORK cluster before running DFT calculations through Matgen. Currently, Matgen only support DFT calculations which run with Vienna Ab initio Simulation Package (VASP), so to use this module, users must have valid VASP license.</p> | ||
<p>This module mainly supports workflow design, workflow submission and workflow status monitoring, analyzed data visualization and workflow cancellation.</p> | <p>This module mainly supports workflow design, workflow submission and workflow status monitoring, analyzed data visualization and workflow cancellation.</p> | ||
| − | |||
<p><strong>1.0 Choose System for DFT calculation</strong></p> | <p><strong>1.0 Choose System for DFT calculation</strong></p> | ||
| Line 10: | Line 9: | ||
[[Image:1.png|500px|frameless|center]] | [[Image:1.png|500px|frameless|center]] | ||
<p style="text-align:center">Pic 1 Enter “Inorganic Crystal Materials” module</p> | <p style="text-align:center">Pic 1 Enter “Inorganic Crystal Materials” module</p> | ||
| − | [[Image: | + | [[Image:2.png|500px|frameless|center]] |
<p style="text-align:center">Pic 2 Search the target material and enter material detail page</p> | <p style="text-align:center">Pic 2 Search the target material and enter material detail page</p> | ||
| − | [[Image: | + | [[Image:3.png|500px|frameless|center]] |
<p style="text-align:center">Pic 3 Enter DFT calculation page: click “RERUN</p> | <p style="text-align:center">Pic 3 Enter DFT calculation page: click “RERUN</p> | ||
| − | |||
<p><strong>1.1 Workflow Design</strong></p> | <p><strong>1.1 Workflow Design</strong></p> | ||
| Line 20: | Line 18: | ||
<p><strong>1.1.1 Calculation Process Design</strong></p> | <p><strong>1.1.1 Calculation Process Design</strong></p> | ||
<p>Though Matgen provide five calculations in the workflow, it is not necessary to run all in reality and users may choose part of properties for simulation. In this case, users can click the calculation name and delete it.</p> | <p>Though Matgen provide five calculations in the workflow, it is not necessary to run all in reality and users may choose part of properties for simulation. In this case, users can click the calculation name and delete it.</p> | ||
| − | [[Image: | + | [[Image:4.png|500px|frameless|center]] |
<p style="text-align:center">Pic 4 Delete “Magnetic Testing”: click “Magnetic Testing”; click “delete”</p> | <p style="text-align:center">Pic 4 Delete “Magnetic Testing”: click “Magnetic Testing”; click “delete”</p> | ||
<p><strong>1.1.2 Input Parameter Setting</strong></p> | <p><strong>1.1.2 Input Parameter Setting</strong></p> | ||
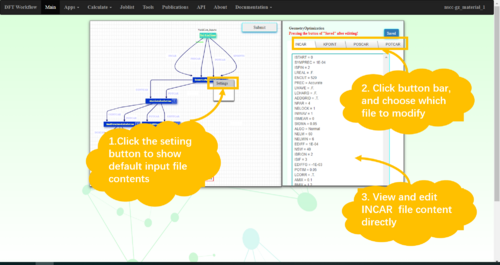
<p>VASP has four input files, INCAR, KPOINTS, POSCAR and POTCAR. For INCAR, KPOINTS, and POSCAR, Matgen provides a default content so that the VASP calculation result can be more physically meaningful. Users can adjust file content directly through choosing calculation, click the file name users want to edit and modifying content in the right side. For POTCAR, as POTCAR file can be generated by combining POTCAR files of each element in the system together, users choose pseudo potential of each element instead of editing the whole POTCAR file.</p> | <p>VASP has four input files, INCAR, KPOINTS, POSCAR and POTCAR. For INCAR, KPOINTS, and POSCAR, Matgen provides a default content so that the VASP calculation result can be more physically meaningful. Users can adjust file content directly through choosing calculation, click the file name users want to edit and modifying content in the right side. For POTCAR, as POTCAR file can be generated by combining POTCAR files of each element in the system together, users choose pseudo potential of each element instead of editing the whole POTCAR file.</p> | ||
| − | [[Image: | + | [[Image:5.png|500px|frameless|center]] |
<p style="text-align:center">Pic 5 Edit “Geometry Optimization” input files: click “Geometry Optimization”; click “Settings”; click the file to modify; modify directly</p> | <p style="text-align:center">Pic 5 Edit “Geometry Optimization” input files: click “Geometry Optimization”; click “Settings”; click the file to modify; modify directly</p> | ||
<p><strong>1.1.3 Calculation Configuration Setting</strong></p> | <p><strong>1.1.3 Calculation Configuration Setting</strong></p> | ||
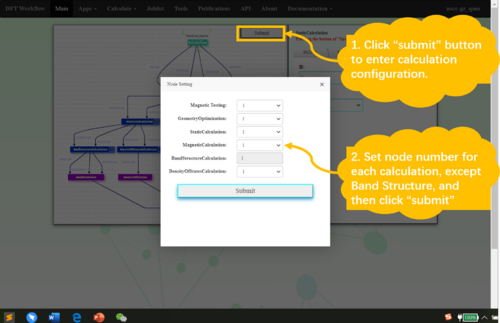
<p>For high-throughput jobs, users need to set calculation configurations to better run VASP. The main configuration is node number. In Matgen, users can choose node number smaller than 4 for each calculation except Band Structure Calculation.</p> | <p>For high-throughput jobs, users need to set calculation configurations to better run VASP. The main configuration is node number. In Matgen, users can choose node number smaller than 4 for each calculation except Band Structure Calculation.</p> | ||
| − | [[Image: | + | [[Image:6.png|500px|frameless|center]] |
<p style="text-align:center">Pic 6 Set node number for each calculation: click “submit” button after editing input files; click “submit”; choose node number for each calculation; click submit to submit workflow</p> | <p style="text-align:center">Pic 6 Set node number for each calculation: click “submit” button after editing input files; click “submit”; choose node number for each calculation; click submit to submit workflow</p> | ||
<p><strong>1.2 Workflow Status Monitoring</strong></p> | <p><strong>1.2 Workflow Status Monitoring</strong></p> | ||
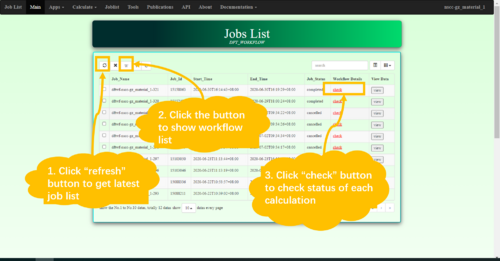
<p>After workflow submission, users will enter job list page, and can check workflow status and status of each calculation.</p> | <p>After workflow submission, users will enter job list page, and can check workflow status and status of each calculation.</p> | ||
| − | [[Image: | + | [[Image:7.png|500px|frameless|center]] |
<p style="text-align:center">Pic 7 Get status of each calculation in a workflow: click “refresh” button; click “W” button; click “check” button</p> | <p style="text-align:center">Pic 7 Get status of each calculation in a workflow: click “refresh” button; click “W” button; click “check” button</p> | ||
| − | [[Image: | + | [[Image:8.png|500px|frameless|center]] |
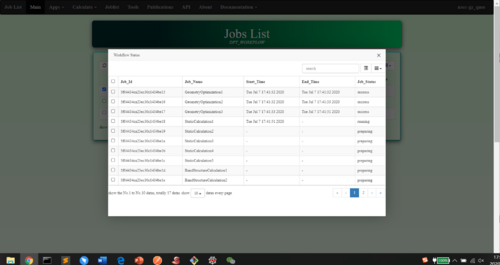
<p style="text-align:center">Pic 8 Status of each calculation in a workflow</p> | <p style="text-align:center">Pic 8 Status of each calculation in a workflow</p> | ||
<p><strong>1.3 Data Visualization</strong></p> | <p><strong>1.3 Data Visualization</strong></p> | ||
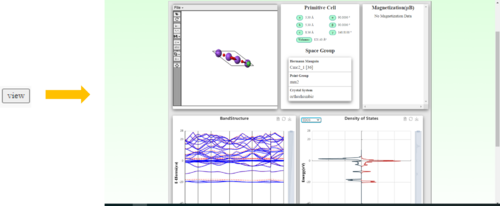
<p>Once each calculation in a workflow is finished and there is no error in calculation, users can see results which have been processed after calculation.</p> | <p>Once each calculation in a workflow is finished and there is no error in calculation, users can see results which have been processed after calculation.</p> | ||
| − | [[Image: | + | [[Image:9.png|500px|frameless|center]] |
<p style="text-align:center">Pic 9 Get data after workflow calculation: click “view” button in job lists</p> | <p style="text-align:center">Pic 9 Get data after workflow calculation: click “view” button in job lists</p> | ||
<p><strong>1.4 Workflow Cancellation</strong></p> | <p><strong>1.4 Workflow Cancellation</strong></p> | ||
<p>To cancel a running workflow, users can select this workflow from job list, and then cancel it.</p> | <p>To cancel a running workflow, users can select this workflow from job list, and then cancel it.</p> | ||
| − | [[Image: | + | [[Image:10.png|500px|frameless|center]] |
<p style="text-align:center">Pic 10 Cancel workflow: select from job list; click “X” button</p> | <p style="text-align:center">Pic 10 Cancel workflow: select from job list; click “X” button</p> | ||
Revision as of 09:41, 8 July 2020
Matgen also provide module to run and analyze Density Functional Theory (DFT) calculations. It relies on Tianhe-2 computing cluster to run simulation jobs, so users need to login with their starlight account, associate system account and make sure they have bought computing resources on Tianhe-2c WORK cluster before running DFT calculations through Matgen. Currently, Matgen only support DFT calculations which run with Vienna Ab initio Simulation Package (VASP), so to use this module, users must have valid VASP license.
This module mainly supports workflow design, workflow submission and workflow status monitoring, analyzed data visualization and workflow cancellation.
1.0 Choose System for DFT calculation
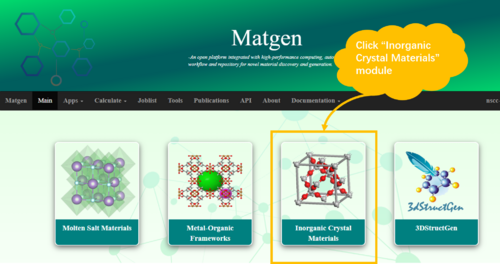
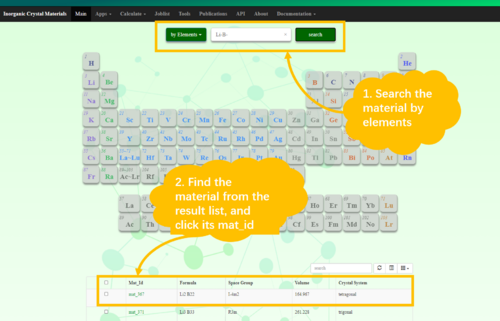
To run DFT simulation for a particular system, users can enter this module through “Inorganic Crystal Materials” module in the main page, and then users can search and choose the material for DFT calculation.
Pic 1 Enter “Inorganic Crystal Materials” module
Pic 2 Search the target material and enter material detail page
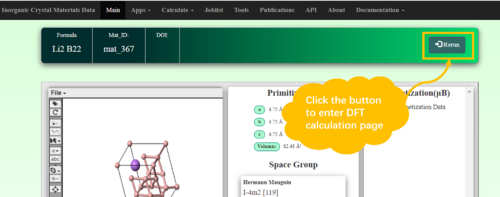
Pic 3 Enter DFT calculation page: click “RERUN
1.1 Workflow Design
Matgen provides a whole workflow which includes Magnetic Testing, Geometry Optimization, Static Calculation, Band Structure Calculation, Density of States Calculation, and Magnetic Calculation. Users can choose any calculation to run and modify Input Files for each calculation.
1.1.1 Calculation Process Design
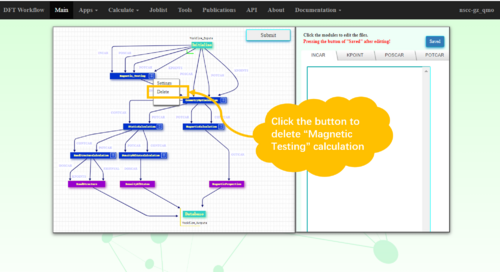
Though Matgen provide five calculations in the workflow, it is not necessary to run all in reality and users may choose part of properties for simulation. In this case, users can click the calculation name and delete it.
Pic 4 Delete “Magnetic Testing”: click “Magnetic Testing”; click “delete”
1.1.2 Input Parameter Setting
VASP has four input files, INCAR, KPOINTS, POSCAR and POTCAR. For INCAR, KPOINTS, and POSCAR, Matgen provides a default content so that the VASP calculation result can be more physically meaningful. Users can adjust file content directly through choosing calculation, click the file name users want to edit and modifying content in the right side. For POTCAR, as POTCAR file can be generated by combining POTCAR files of each element in the system together, users choose pseudo potential of each element instead of editing the whole POTCAR file.
Pic 5 Edit “Geometry Optimization” input files: click “Geometry Optimization”; click “Settings”; click the file to modify; modify directly
1.1.3 Calculation Configuration Setting
For high-throughput jobs, users need to set calculation configurations to better run VASP. The main configuration is node number. In Matgen, users can choose node number smaller than 4 for each calculation except Band Structure Calculation.
Pic 6 Set node number for each calculation: click “submit” button after editing input files; click “submit”; choose node number for each calculation; click submit to submit workflow
1.2 Workflow Status Monitoring
After workflow submission, users will enter job list page, and can check workflow status and status of each calculation.
Pic 7 Get status of each calculation in a workflow: click “refresh” button; click “W” button; click “check” button
Pic 8 Status of each calculation in a workflow
1.3 Data Visualization
Once each calculation in a workflow is finished and there is no error in calculation, users can see results which have been processed after calculation.
Pic 9 Get data after workflow calculation: click “view” button in job lists
1.4 Workflow Cancellation
To cancel a running workflow, users can select this workflow from job list, and then cancel it.
Pic 10 Cancel workflow: select from job list; click “X” button
